Volume V - April 2000
 "Boats is boats is boats" which is
daughter Tiffany’s reaction to a time-honored, unavoidable phenomenon that happens
when any boater gets an audience: the parts stories, the maintenance sagas, the epic
dramas (and comedies) of boat projects. "No shit, there I was…" is much
less often the prelude to a storm at sea, than the opening statement of a tale of man and
his wrench. "Boats is boats is boats" which is
daughter Tiffany’s reaction to a time-honored, unavoidable phenomenon that happens
when any boater gets an audience: the parts stories, the maintenance sagas, the epic
dramas (and comedies) of boat projects. "No shit, there I was…" is much
less often the prelude to a storm at sea, than the opening statement of a tale of man and
his wrench.
There are those that yawn and those that eat it up. This
page is for the latter group .
~~~~~~~~~~~~~~~~~~~~~~~~~~~~~~~~~~~~
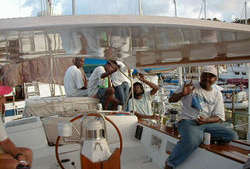
Every year hundreds
of boats come to Trinidad for several months at a time. In summer,
they come south dodge the hurricane risk above 12N, and in winter
to take part in Carnival - the third largest in the Eastern Hemisphere.
Regardless of the time of year, they come to take advantage of Trinidad's
boatyard center (seven haul-out facilities and eight marinas) its
eager and reasonable labor, well-stocked chandleries, and prompt shipping
connections from the States.
We came for all
these reasons. As most of you know, we spent five months at Independent
Boatyard in St. Thomas last year working on the boat. What you may
not have realized was that that was just Phase I. (See Engine Room
- Archives). Originally we'd thought we would sail Tackless
II to Trinidad for the whole refit, but we split our "To Do List"
in two in order to stay in St. Thomas to oversee the sale of Whisper.
So, after a great
summer of NO PROJECTS, in we sailed to Trinidad in September 1999.
 little perspective: When I first bought Tackless II in November
of 1990, I immediately started making plans to upgrade her to cruising
condition. For example, I bought a matched pair of Airguide gauges
(barometer and clock) at a marine flea market. Then I carried them
loose on the nav station for over a year because installing them would
require 6 screws into a bulkhead somewhere in the main salon. What
if I chose the wrong place to mount them? What if I didn't like them
there? Or they weren't readable enough in that position? What would
I do about those screw holes?
little perspective: When I first bought Tackless II in November
of 1990, I immediately started making plans to upgrade her to cruising
condition. For example, I bought a matched pair of Airguide gauges
(barometer and clock) at a marine flea market. Then I carried them
loose on the nav station for over a year because installing them would
require 6 screws into a bulkhead somewhere in the main salon. What
if I chose the wrong place to mount them? What if I didn't like them
there? Or they weren't readable enough in that position? What would
I do about those screw holes?
Well, it's ten
years later now, and I can tell you two things for sure, 1) after
you read the next few paragraphs you will see that I am over that
fear of any drilling, cutting or changing of the "way it was" and
2) we moved those gauges?.and, just as I feared, I have six unfilled
holes in the forward bulkhead of the main salon.
With that said,
I will try to fill you in on all the changes as they've happened on
our 2nd half of the refit here in Trinidad.
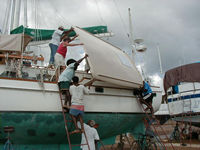
The
Hard Top
 As
Gwen has mentioned in The Captain's Log, we had our "dream
top" made and installed. It, too, required some major "changing of
the way things were." First we had to modify and move the boom gallows
forward about eighteen inches. Then we moved the attachment point
for the main sheet to the boom back 34 inches. This allowed us to
design the hard top to attach to the gallows itself for all the rear As
Gwen has mentioned in The Captain's Log, we had our "dream
top" made and installed. It, too, required some major "changing of
the way things were." First we had to modify and move the boom gallows
forward about eighteen inches. Then we moved the attachment point
for the main sheet to the boom back 34 inches. This allowed us to
design the hard top to attach to the gallows itself for all the rear
 support. In front, there are two teak-reinforced fiberglass front
legs that are both bedded in 5200 and screwed down to the front coaming.
This gives us over 8 feet of open entry to the cockpit from either
side, the propane lockers are now easily accessible, and the main
sheet can run out freely when we want to run down wind - all major
improvements over "the way things were!"
support. In front, there are two teak-reinforced fiberglass front
legs that are both bedded in 5200 and screwed down to the front coaming.
This gives us over 8 feet of open entry to the cockpit from either
side, the propane lockers are now easily accessible, and the main
sheet can run out freely when we want to run down wind - all major
improvements over "the way things were!"
  o
build the top Otto and his crew built a mold out of wood, covered
it with thin, shaped plywood. The shape was taken from our original
bimini bows, only widened a bit to cover the cockpit teak. On top
of the mold they laid two layers of fiberglass. On top of the fiberglass
they laid a layer of half-inch Westcor, a lightweight honeycombed
material. The core was then cut to provide channels for wiring in
lights on the underneath side and for the placement of teak pads for
mounting the solar panels on top. Then the core was covered with two
more layers of fiberglass, the front legs shaped and fitted, and finally
the whole thing was faired smooth and painted on top to match the
Linen color of our Sunbrella and underneath Oyster white to match
the rest of the cockpit. Total weight is less than 200lbs, and it
can be removed if really necessary. Teak handrails were made for the
top outside edge and the underneath outboard edge. These rails are
mounted to each other through the top to give added support to the
entire length. The top handrail is solid and acts as a gutter allowing
us to catch rainwater, while the inside rail is traditional "grab
style". o
build the top Otto and his crew built a mold out of wood, covered
it with thin, shaped plywood. The shape was taken from our original
bimini bows, only widened a bit to cover the cockpit teak. On top
of the mold they laid two layers of fiberglass. On top of the fiberglass
they laid a layer of half-inch Westcor, a lightweight honeycombed
material. The core was then cut to provide channels for wiring in
lights on the underneath side and for the placement of teak pads for
mounting the solar panels on top. Then the core was covered with two
more layers of fiberglass, the front legs shaped and fitted, and finally
the whole thing was faired smooth and painted on top to match the
Linen color of our Sunbrella and underneath Oyster white to match
the rest of the cockpit. Total weight is less than 200lbs, and it
can be removed if really necessary. Teak handrails were made for the
top outside edge and the underneath outboard edge. These rails are
mounted to each other through the top to give added support to the
entire length. The top handrail is solid and acts as a gutter allowing
us to catch rainwater, while the inside rail is traditional "grab
style".
 Once
Otto's installation crew was done, I wired the reading lights (one
over each forward corner) and an overhead light (Alpen Glow -red/white)
over the binnacle. All the internal wiring is led down the port leg
to the control panel. We still have the option of our basket light
as well. On top of the hard top we mounted 4-75 watt Seimens solar
panels. On each side of the boom two panels are framed end-to-end
in 1?" aluminum angle and mounted to the top with aluminum mounts
that screw in through the teak blocks that were glassed in. The panels
are wired together in series, but we did not run the solar panel wiring
down through the top, not wanting to risk any holes on the topside
where water could enter. Instead, the feed wire wraps around the lip
of the top and then enters the boat via that same port leg. A little
water does seem to run down this wire into the cockpit, but we hope
to solve that. Once
Otto's installation crew was done, I wired the reading lights (one
over each forward corner) and an overhead light (Alpen Glow -red/white)
over the binnacle. All the internal wiring is led down the port leg
to the control panel. We still have the option of our basket light
as well. On top of the hard top we mounted 4-75 watt Seimens solar
panels. On each side of the boom two panels are framed end-to-end
in 1?" aluminum angle and mounted to the top with aluminum mounts
that screw in through the teak blocks that were glassed in. The panels
are wired together in series, but we did not run the solar panel wiring
down through the top, not wanting to risk any holes on the topside
where water could enter. Instead, the feed wire wraps around the lip
of the top and then enters the boat via that same port leg. A little
water does seem to run down this wire into the cockpit, but we hope
to solve that.
 The
new windows and sunshades are shades attach to the top via a bolt-rope
that slides into a plastic track. Much like cloth top we had before,
there are two side windows and sunshades on each side. The dodger
is in four panels this time, with two small fixed ones on the curved
end sections and two large ones in the center that can roll up. The
side windows have covers that twist-lock on to either cut down on
salt sprayonlong passages or cut glare in low angle sun. Having two
center windows gives a much wider opening for ventilation when the
windows are rolled up, and we imagine it will give us more flexibility
for air underway. Our removable awning has it's own track across the
front, and we have a fairly close fitting Sunbrella shade across the
back. Coupled with the full-deck awning we had made last fall, this
arrangement keeps the boat substantially cooler. The
new windows and sunshades are shades attach to the top via a bolt-rope
that slides into a plastic track. Much like cloth top we had before,
there are two side windows and sunshades on each side. The dodger
is in four panels this time, with two small fixed ones on the curved
end sections and two large ones in the center that can roll up. The
side windows have covers that twist-lock on to either cut down on
salt sprayonlong passages or cut glare in low angle sun. Having two
center windows gives a much wider opening for ventilation when the
windows are rolled up, and we imagine it will give us more flexibility
for air underway. Our removable awning has it's own track across the
front, and we have a fairly close fitting Sunbrella shade across the
back. Coupled with the full-deck awning we had made last fall, this
arrangement keeps the boat substantially cooler.
The
Stern Arch
The next major
addition is the new stainless steel stern arch. We hesitate to call
it a radar arch, since we have left our radar on the backstay. However,
all the other toys WILL be mounted on there. We designed the new arch
to be built into the existing stern rail. This required, of course,
for the old rail to be removed, not an easy task in itself since there
were five though-deck bolts to free up and bedding almost 20 years
old to break loose. Then a template had to make for the welder and
many measurements of the camber of the deck and of the variations
in the toe-rail thickness across the stern. This is probably why most
people just mount their arch inside the existing stern pulpit. However
the end result is much cleaner. The only real mounting problems came
from the new feet and the angles and lengths they needed to be. If
there were one thing I would do differently "next time," it would
be to make a much more accurate three-dimensional template of the
mounting area. After two trips back to the shop to get them adjusted,
it all worked out well.
  n
the starboard corner of the arch is the wind generator pole mount,
36" high above the arch, mounted on a solid SS plate. This length
had to be increased 7" after the first fitting as the wind generator's
blades would not completely clear the radar antenna (OOPS!). In the
center of the arch, there is another mounting plate for a halogen
deck light and the stern nav light. The port corner was supposed to
get all the other antennas, but so far we've just left them where
they were on the center of the stern rail, as moving them requires
major rewiring. Sticking out aft are the dingy davits across which
a fifth solar panel will mount. We intend these davits mostly to secure
the dinghy at anchor overnight, but with the vane gear there we may
not be able to have our cake and eat it too. Our original design had
two solar panels running longitudinally, but the large radar antenna
was going to block part of each most of the time, so we've decided
to go with the one across the back that can be tilted if we wish to
chase the sun. (The panels on the hardtop are more or less fixed,
since most cruisers advise that "chasing the sun" gets old quickly
and few bother!) n
the starboard corner of the arch is the wind generator pole mount,
36" high above the arch, mounted on a solid SS plate. This length
had to be increased 7" after the first fitting as the wind generator's
blades would not completely clear the radar antenna (OOPS!). In the
center of the arch, there is another mounting plate for a halogen
deck light and the stern nav light. The port corner was supposed to
get all the other antennas, but so far we've just left them where
they were on the center of the stern rail, as moving them requires
major rewiring. Sticking out aft are the dingy davits across which
a fifth solar panel will mount. We intend these davits mostly to secure
the dinghy at anchor overnight, but with the vane gear there we may
not be able to have our cake and eat it too. Our original design had
two solar panels running longitudinally, but the large radar antenna
was going to block part of each most of the time, so we've decided
to go with the one across the back that can be tilted if we wish to
chase the sun. (The panels on the hardtop are more or less fixed,
since most cruisers advise that "chasing the sun" gets old quickly
and few bother!)
 ack
on the starboard side of the arch we had an arm for an outboard motor
hoist mounted. On the other side we had a removable holder for two
fenders made, and our Tailblazer BBQ is back in place on the stern.
Before the welder was done, we had him add lots of other little things:
cleats for the dingy and motor hoisting tackles, separate "attachment
" rings for the hoist purchases when not in use, and "L" brackets
at the base of each stanchion (always needed to tie or hook something
down). ack
on the starboard side of the arch we had an arm for an outboard motor
hoist mounted. On the other side we had a removable holder for two
fenders made, and our Tailblazer BBQ is back in place on the stern.
Before the welder was done, we had him add lots of other little things:
cleats for the dingy and motor hoisting tackles, separate "attachment
" rings for the hoist purchases when not in use, and "L" brackets
at the base of each stanchion (always needed to tie or hook something
down).
On
Deck
Our last delivery
from our metal-man Harry were our two new safety rails (also known
as granny bars!) These will mount to either side of the mast to help
keep crew members in place when raising or reefing sails. I had a
couple of unsettling tumbles on Whisper two years ago in choppy conditions,
and with Tackless II's higher coach roof the fall could be
farther. We had the safety rails made from 1" stainless which straddle
each salon hatch with a third leg coming down outboard as a brace.
The
Salon
Moving inside,
it really gets serious. We took out the main salon table completely.
In its place we added a 60 liter Minus 40, 12 volt/air-cooled freezer,
which we had shipped in from South Africa. Offsetting it slightly
to port, we then had a new table built around it. This literally had
to be built around it, as the hatch was too small to allow it to come
in whole, although it is designed to pull clear of the mast if we
need access to the mast step. The freezer is top loading so the table
has an opening lid that will allow access. The original side leaves
were trimmed down and reused. Our varnishers are having fun trying
to match a stain for the white oak to bring it close to the teak of
the table (white oak not being available here!)
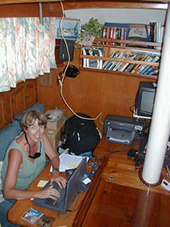 Next,
in the space forward of the table, between the mast and the main bulkhead,
there is a new wine locker. This is made of teak in a style to match
the table. On the side that faces the passageway there are a pair
of rectangular doors?where the "wine" will go, and above them is a
single horizontal door that opens down where the VCR will go. On the
opposite side there is a matching door that will house paper and computer
supplies, and on the top of the box will mount (fashion and means
to be determined later) the new HP printer. This corner, therefore,
now become Gwen's "office". This entire addition is built in a way
to be removable (granted, with a certain amount of effort), because
our 10-battery house bank is located directly under it. God help me
if the new gel cells don't hold up as advertised!!!!! Next,
in the space forward of the table, between the mast and the main bulkhead,
there is a new wine locker. This is made of teak in a style to match
the table. On the side that faces the passageway there are a pair
of rectangular doors?where the "wine" will go, and above them is a
single horizontal door that opens down where the VCR will go. On the
opposite side there is a matching door that will house paper and computer
supplies, and on the top of the box will mount (fashion and means
to be determined later) the new HP printer. This corner, therefore,
now become Gwen's "office". This entire addition is built in a way
to be removable (granted, with a certain amount of effort), because
our 10-battery house bank is located directly under it. God help me
if the new gel cells don't hold up as advertised!!!!!
bove
the printer and the new wine locker is the TV on its old swivel mount.
I'm rather attached to this fixture which allows us to swivel the
TV to one side or the other. Underway, it secures with turnbuckles.
I mounted this back in Florida and we have never had an accident?yet!
So it stays - after all, only so much change can be tolerated!! BUT
above the TV, there are two 40-inch bookshelves, which won't take
Gwen long to fill up as we have crates of books we brought with us
plus a dozen or so we bought over Christmas?..I remember having time
to read!
On the starboard
side forward in the main salon we used to have a hanging locker. Now
we have a slightly wider locker that houses a 110v washer/dryer combo.
Yup, you read it right!!!! 17" x 23" x 33", 165lbs, and 17 gallons
per load! All we had to do is make the locker 4 inches wider. Doesn't
sound like much, but we are talking MAJOR rip out. Amazingly, all
that effort and after the fact it's very difficult to tell anything
changed! Celebration was stalled a bit by a pressure switch broken
in shipment, but once repaired it's working like a top and makes the
Admiral really purr. Still to be installed the ducting for the new
used Marine Airrrr conditioner.
Tired yet? There
is more!
  e've
installed new molded countertops and sinks in the both heads and the
galley. This was partially an aesthetic indulgence, but we were really
swayed by the molded-in blacksplashes and fids that will keep stray
water on the countertops from leaking into the wood. The counters
are of ?" Decoran, a cousin of Corian which is made here in Trinidad.
What was nice was the ability to choose e've
installed new molded countertops and sinks in the both heads and the
galley. This was partially an aesthetic indulgence, but we were really
swayed by the molded-in blacksplashes and fids that will keep stray
water on the countertops from leaking into the wood. The counters
are of ?" Decoran, a cousin of Corian which is made here in Trinidad.
What was nice was the ability to choose 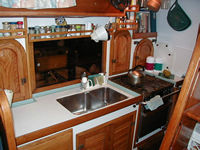 colors.
Because they make it up here, essentially, it seems, from a recipe,
you can actually get the color you dream of. The competitors who ship
sheets of stuff in from the States had a very limited selection. Gwen
picked a light, mint green with white fleck for the heads with white
molded-in basins and nice new fixtures. In the forward head, the new
fixture is designed to pull out and double as a shower?.just in case
the stall shower is filled high with sh-t at the same time we have
guests! What a bear THAT thing was to install! In the galley she got
creative and went for a white composite counter with the mint green
as a border and a new shiny stainless sink from Scandvik. I did some
major replumbing underneath with the macerator pump-out (since the
sink is right at the water line.) We are really pleased with the end
result. colors.
Because they make it up here, essentially, it seems, from a recipe,
you can actually get the color you dream of. The competitors who ship
sheets of stuff in from the States had a very limited selection. Gwen
picked a light, mint green with white fleck for the heads with white
molded-in basins and nice new fixtures. In the forward head, the new
fixture is designed to pull out and double as a shower?.just in case
the stall shower is filled high with sh-t at the same time we have
guests! What a bear THAT thing was to install! In the galley she got
creative and went for a white composite counter with the mint green
as a border and a new shiny stainless sink from Scandvik. I did some
major replumbing underneath with the macerator pump-out (since the
sink is right at the water line.) We are really pleased with the end
result.
New
Diesel Tank
We have removed
the water tank from under the port settee and converted it to a diesel
tank. This will give us an additional 33 gallons of fuel before counting
any jerry jugs we put on deck. (The "L" end of the tank was already
cut off in St. Thomas to allow for more battery room.) This tank will
be used as a "holding" tank only. Once our main fuel tank is down
at least 33 gallons, we will pump the entire contents of the new tank
into the main, so the new tank will either be full or empty (baffle
is no long in the tank). It was easy to conceive of the conversion,
but all the water fittings had to be glassed closed and a new plate
on top with fuel inlets and pickups created for the top. Then we had
to ensure there were no leaks, either in the glass tank itself (the
seams being vulnerable to voids) or in the seal of the metal plate
to the tank top. This project moved forward in frustrating microsteps
while everything else was going on, but I'm pleased to report it has
held liquid for five days now with nary a dribble. All we have to
do now is glass it back in under the settee and hook up all the hoses
which are already run.
This conversion
cuts our water storage down to about 125 gallons, which obviously
suggests we're feeling pretty positively about our watermaker! We
are planning to order a second/backup feed pump, which can either
replace the current one or add to it to increase output.
Sisterships and CSY
Stuff
Nearby for much
of our time here in Trinidad has been a Tackless II sister
ship Soggy Paws, whose owners Dave and Stacey are also doing
a big refit. It's always fun to befriend owners of boats "just like
ours", because then you're guaranteed great cocktail conversation?or,
in our case, Joe's Pizza conversation. Though the boats may be the
same, the "To Do Lists" weren't?..at least, not originally. One of
the problems with the sistership phenomenon it can double the projects
as you get insights and ideas from each other. One of Dave's classic
lines was, "Oh, gee, I just want you to have as much fun as we're
having." This was in reference to chain plates, which Dave had to
remove and replace. Formerly a bareboat in the Bahamas, Soggy Paws
has seen harder use than Tackless II, but David wouldn't rest
until we'd checked ours. This involved ripping out the wood liner
in all the cabinets, cleaning up all the metal and checking it with
Rig Check, a chemical die that reveals hidden cracks. Although we
came up clean, we did discover some anomalies in construction. Tackless
II's aft-most pair of chain plates are an inverted T rather than
the traditional CSY triangle shape! It also gave us the chance to
clean up all our bonding connections. Dave still isn't happy that
we didn't pull all ours out, but then he's painting his boat and we
aren't!
 ronically,
one of the things we had thought of doing here in Trinidad, was moving
(which would involve replacing) all our chainplates to the outside
as Pieter and Pat Stoeken did on the CSY Independence and David Kummerle
did on the CSY 37 Glory of Christiansted. The objective was to solve
our perpetual leaks. To our puzzlement, the one on the port side behind
the nav station has cured itself. Don did replace and rebed the shore-power
inlet there, but neither of us would have pegged that as the source.
The matching leak on the starboard side into the galley cupboard has
also just been solved. We found a void about an inch square where
the curving glass of the step down meets the forward deck joint! So!
We are optimistic that we MAY have won a major battle! ronically,
one of the things we had thought of doing here in Trinidad, was moving
(which would involve replacing) all our chainplates to the outside
as Pieter and Pat Stoeken did on the CSY Independence and David Kummerle
did on the CSY 37 Glory of Christiansted. The objective was to solve
our perpetual leaks. To our puzzlement, the one on the port side behind
the nav station has cured itself. Don did replace and rebed the shore-power
inlet there, but neither of us would have pegged that as the source.
The matching leak on the starboard side into the galley cupboard has
also just been solved. We found a void about an inch square where
the curving glass of the step down meets the forward deck joint! So!
We are optimistic that we MAY have won a major battle!
In addition to
Soggy Paws there is a 44 walk-over Nirvana, which is at least two
years into a total gut and refit, a 37 called Conjoe II, which is
getting some post-hurricane repair, plus there have been two Antigua
44s. CSY buffs all know that Antiguas are made from the same CSY molds
that made both Whisper and Tackless II. One of these Antiguas,
however, Wind Shadow is Antigua Hull #002, and she is one of the four
hulls, like Tackless II that were laid up by CSY and then sold
to Coates Marine to finish. Tackless II had an owner who insisted
she be finished as a CSY. We haven't seen the inside of Wind Shadow,
but outside she could be a clone! The other Antigua here is Sky Rocket
#???. Sky Rocket is a later Antigua with a different look and finished
off as a ketch.
e
still have a few more projects, not the least of which will be to
get everything back in its proper place?some of which will be new,
some old, and some in the trash or giveaway. Even that becomes tough,
since much that we would throw out can evidently make good trading
items with some of the Indians we may fairly soon encounter. But,
we do feel that we are winding things up at last.
|